
Wednesday, August 19, 2015

Monday, August 17, 2015
Entry # @#$%! - Building Tristar's Panzer IV Ausf. C

I really, really, really hate when my compulsive gene kicks in and this time, it kicked in hard. I got to looking at my fenders and their placement. Then I looked at numerous pictures of real Panzer IV's online and my fenders are just sitting way too low. Should have noticed it when I first placed them but totally missed it.


Hopefully, I can get it back together in a week with some additional details to the fender in order to speed up the build. Ugh!
Friday, August 14, 2015
Entry #26 - Building Tristar's Panzer IV Ausf. C
Hallelujah! The Panzer has fenders! Using copious amounts of epoxy glue and superglue on the sides and bottom I am hoping that they will stay on. The good thing about building armor models is that weathering will make up for mistakes and some dry mud will do nicely to cover up the blobs of glue and soldering globs.

This the first time I have made a complete set of PE fenders and I see why many modelers use them. I was able to put dings along the edges and the ends to recreate battle damage. This added a level of realism that just can't be achieved with plastic fenders.

Wednesday, August 12, 2015
Monday, August 10, 2015
Entry #25 - Building Tristar's Panzer IV Ausf. C

Is has come time to finish off the back end of my Panzer IV Ausf. C. Since there are no rear pictures of the Panzer I am basing my model on, I get to make some educated guesses (or better known as, make it up as you go along). I did find a picture of a late war early Panzer IV so I will use this as a reference.
First decision to be made is what to do with the turret traverse motor muffler (the little muffler that sits above the bigger, engine muffler). Reference pictures show early Panzers with and without the muffler later in the war. Since my early Panzer IV is clearly beat up I decided not to install it. However, I did want to represent that it was there at one time so I used a bit of styrene to make a broken pipe (see green arrow).

I really did not like the look of the Tristar's straps for the muffler so those got replaced from ones in the Eduard's update set. I also replaced the tow cable brackets with custom ones (yeah, I just bent some brass rod and stuck them in).
The last issue I had was the rear stop light lamp (the picture above shows a Notek rear light in it's place but I decided against it). The Tristar bracket was too thick, so again I went with a custom made one. There is a small indention in the rear armor angle bracket to place the stop light bracket but I did not like the placement (the light itself was pressed up against the muffler). So, I filled the area and I was able to move bracket to a better location.
Finally, I added all the other small details and I am calling it done (I will add the chains at the very last because I know my ham hands will definitely find a way to break them off).

Wednesday, August 5, 2015
Monday, August 3, 2015
Entry #24 - Building Tristar's Panzer IV Ausf. C
Today I decided to fix something that has been bugging me on this kit. Also, I really need to remember to file this under a job better performed before installing on the tank.
This second major molding issue with the Tristar kit is that one of the fins on the exhaust vane is molded with an indention (by the way, first molding issue was the lip on the front plate). This is easily fixed with styrene, but since I have multiple kits I decided to cut a good vane to replace the bad one. Kinda like being a Dentist?

I carefully cut out the bad vane and sanded the sides down smooth.

The replacement vein was sanded to size and inserted. Ahhh, looks much better. Again, should have done this when the part was loose, but I sure like to do things the hard way.

I also decided to add a tweak. In looking a pictures of the turret I noticed there is a small plate that sits below the mantlet.

Friday, July 31, 2015
Entry #23 - Building Tristar's Panzer IV Ausf. C
The replacement fender arrived quicker than I thought. Since this was my third time through, it went together pretty quickly. I remembered to keep a small gap along the outer edge. After it was completed, came the moment of truth. And, there is still a small gap along the connection with the upper hull. Damn!
What happened? Well, in comparing the two fenders, for some inexplicable reason Voyager did not make the angle portion of the tread plate equal on both sides. Oh well, I am tired of messing with the fenders and I will have to live with it.

Wednesday, July 29, 2015
Monday, July 27, 2015
Entry #22 - Building Tristar's Panzer IV Ausf. C
A tale of two fenders.
Bad Fender. I broke the cardinal rule of modeling, "test fit BEFORE soldering". On Bad Fender, I went with looking correct versus placing the part where the instructions say. The fenders on a Panzer IV have the texture plate go all the to edge. However, this creates a gap along the angle portion. Now, if I was a smart person, I would have test fitted before soldering the entire plate. Nope, not this guy!
Good Fender. Followed instructions, it is not 100% correct but hey, no gaps.
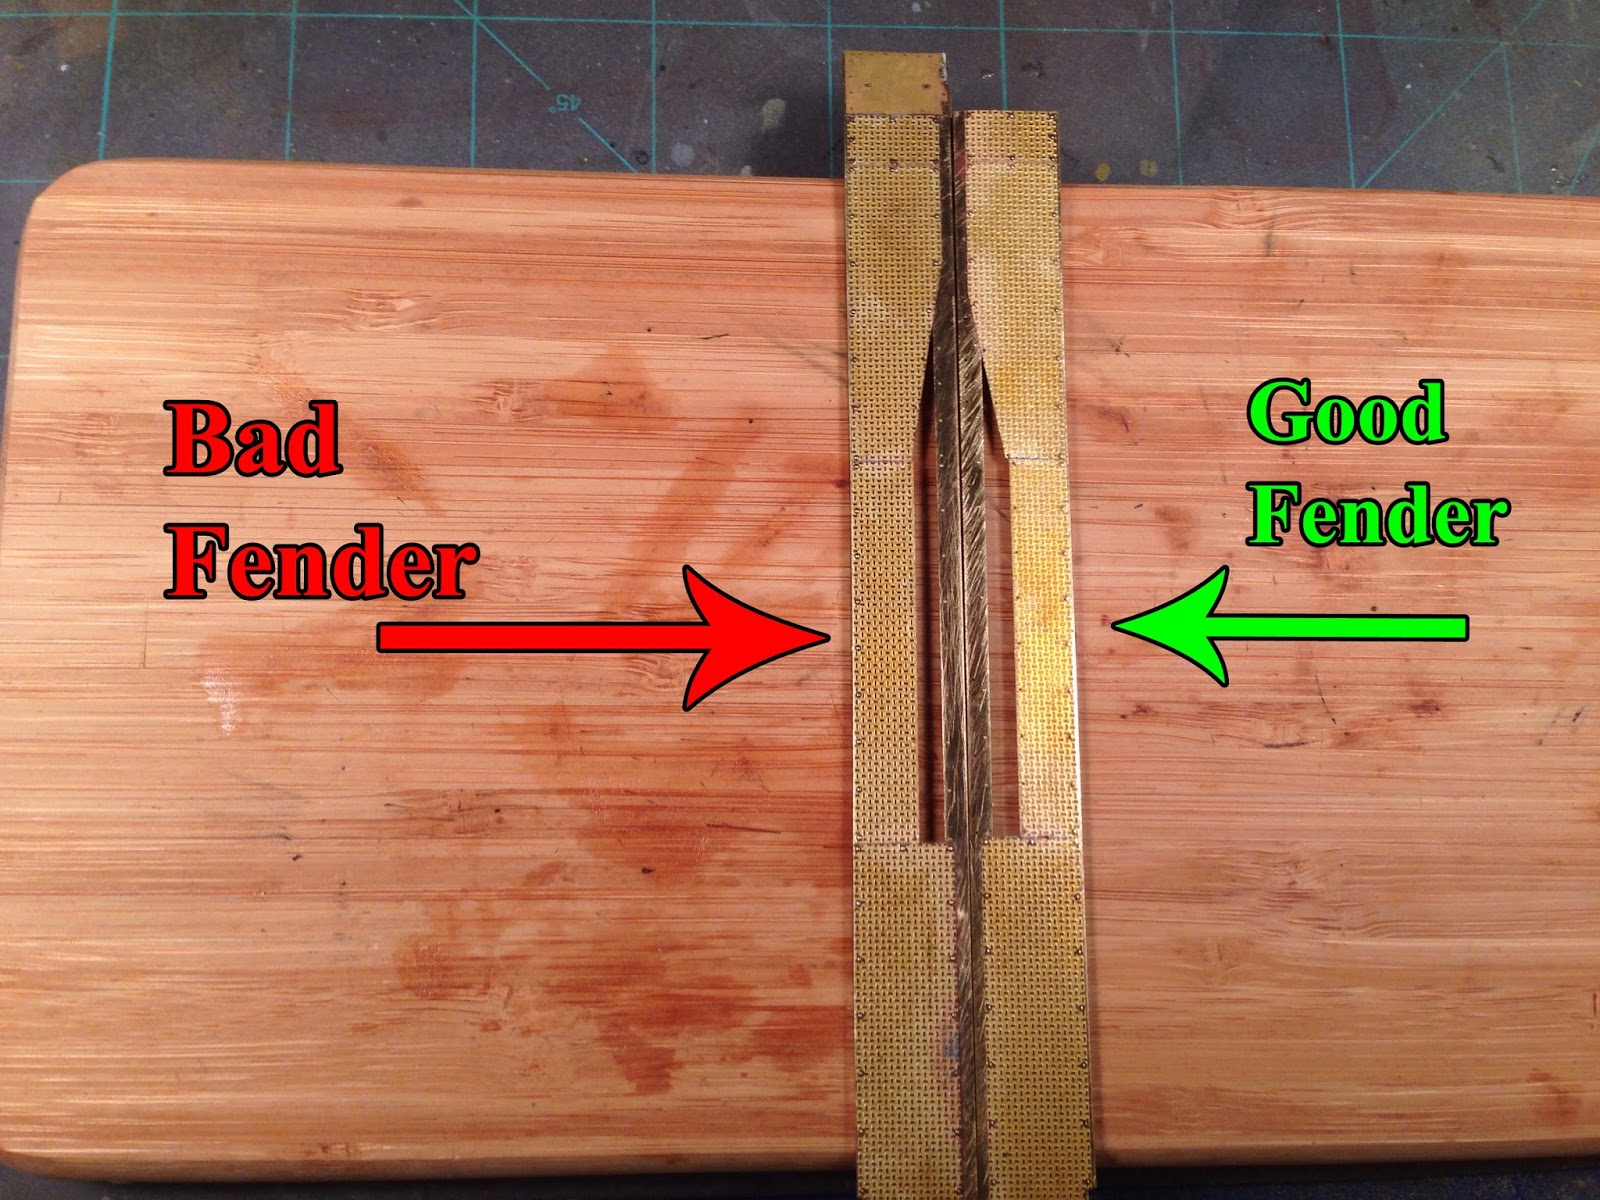
Next problem, how to fix Bad Fender? First I attempted to desolder but that went nowhere fast and eventually would cause a ton of damage. So, I turned to Ebay and bought another set. Good thing Tristar kits are not in hot demand making the upgrade sets cheap.
Live and learn.
Friday, July 24, 2015
Entry #21 - Building Tristar's Panzer IV Ausf. C
Alright, she is finally starting to look like a tank. I attached the lower and upper hull. I first glued the seam at the front, made sure it stayed properly aligned and allowed it set up for a couple of hours.

After the front seam has fully cured I glued the rear seam and held into place until it dried. Now onto to fill gaps and make sure everything lines up for placement of the fenders.

Wednesday, July 22, 2015
Documentary on the Panzer IV
A short but informative documentary on the development of the Panzer IV.
Monday, July 20, 2015
Entry #20 - Building Tristar's Panzer IV Ausf. C
Since Tristar did not include any vision ports I had to make my own. I cut out several strips of clear plexiglass and glued them inside the hull. Hopefully this will give the illusion of thick glass.

Before the upper hull could be installed I needed to make 2 plastic inserts. This was easily done by tracing the outside of the upper hull, cutting it out and then trimming to fit.

This is what it looks like installed.

Lastly, part A12 was glued into place. The instructions want you to attached the piece to the lower hull but it seemed to fit better in the upper hull slot. Now the two hull pieces are ready to be attached.

Friday, July 17, 2015
Entry #19 - Building Tristar's Panzer IV Ausf. C
I have been putting off this job for some time, but it is time to test fit the Modelkasten tracks. I previously assembled a 90 track run with hopes that it would be close. Well, it was close, only took 100 tracks per side. One thing I did learn, Modelkasten is pretty chintzy with extras as I only ended up with 4 extra tracks. Which really sucks as I panned to use any extra track as spares that are attached to the side fender. The main issue that I will have is that kit track guide horns do not match. Oh well, I will figure it out.

Wednesday, July 15, 2015
Beginner Soldering for Scale Models
When I went searching for videos on how to solder photo etch I discovered there were not that many out there. However, this short tutorial by Paul Budzik is very good and his techniques are the ones I am following.
Subscribe to:
Posts (Atom)